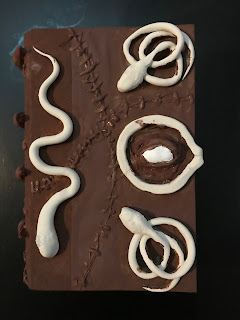
For an awesome fall crafting DIY, I made a replica of the spell book from the beloved movie Hocus Pocus. There are a few things I would have done different so I'll let you know what they are.The pictures are from the way I had done this project so rather than follow the pictures ready what I wrote. Obviously, I was still successful with they why I had made it but I could have been easier.
The first thing is to ensure you have all your supplies. I was winging this project so I did not get all my supplies until a day after I started.
What you will need
-A hardcover think book. I used a copy of Harry Potter and the Deathly Hallows
-modeling clay
-brown, black, white, green, and silver paint
-fake fingers
-skeleton hand
-black tea
-bin for soaking the book in
-yellow gem
-glue gun
-hair dryer
The first you'll want to make about 5 cups of tea and add it to the bin. Soak your book for 5-10 mins. After it is done soaking squeeze out as much excess water as you can. Then using the blow dryer get it as dry as you can. I would dry for about 2 minutes then let it still for about 5-10 minutes and repeat. Let your book dry overnight before moving on to the next steps.
While your book it drying you can start on your clay pieces. I made 4 pretzel snakes by rolling out a piece of clay about the size of my fist. I made one end a little large for the snake’s head. I then wrapped it in a pretzel to match the original book. I then make 2 more snakes that were in a wavy pattern. Then the lock and eye. I baked these in the oven according to the directions.
When the pieces are all baked and cooled down you can start painting them. When I did this I painted the pieces after I glued them on the book and this made it very difficult.
The next day when you book is almost dried you can start painting. First, start by painting the entire book brown. You will need to take breaks in between while you wait for things to dry. When everything is dry and you have painted the entire book you can start gluing on the clay pieces. Start with the front. I used a glue gun to accomplish this. Once all the clay pieces are glued on you can move on to gluing to the fingers. Take 4 fingers and glue the opening where you would put your finger together. I used a glue gun to accomplish this. Then paint the fingers brown. While you let them dry you can work on the skeleton hand. I had no luck finding a skeleton hand that had joints so I had to make due. I was able to find skeleton serving tongs that I was able to break then glue together at an angle. I found these things at dollar tree so it was worth the extra work. Then you will want to paint the hand silver. Once the fingers are dry you can glue them along the binding of the book. Then glue the hand on the back.
Once all the pieces are glued in you can start working on the details. On the real book, it looked as though sink was sewn together to make the cover. So I took my glue gun and made wonky lines on the front back and binding. I then make smaller crosses to mimic the thread that stitched the cover together. I painted them all brown at first. Again once the paint was dry I took a dry brush and a little bit of black paint and start to dry brush the black paint on the “thread” to make it look more realistic.
Now for the eye, using the glue gun start adding glue to the clay eye piece to make it look like it has eyelids. Then make sure to add glue around the eye to make it look like puffy loose skin. You can now paint the eye. I mixed a tiny bit of brown with the white to make the eye look older. The. Using a light green and brown I gave the eye a hazel color. Then using black I created the pupil. Make sure you let them paint dry after each step so the colors won't mix. After the eye is dry you can paint the eyelid and extras skin brown.
I added more black detailing to the book to make it also look old. Make sure you let the paint dry completely before moving on to another color like gold or metallic silver.
Once you are done adding the detail paint to get the book an old and worn look just let it dry. Now you can create a spooky table with your book in the center. Using a picture stand will give it a great look. Tune back into my blog we're we are going to create a spooky witches bottle out of a growler.
Don't forget to follow me on Instagram @theveggiemomster and Facebook veggiemomster.


No comments:
Post a Comment