Sunday, July 22, 2018

Sensory Sunday - Snacking


Hey, it’s Sensory Sunday again and today we will be doing some sorting with snacks! Our kiddie plates are perfect for this easy project. This activity is good for developing a child’s sorting and patterning skills. 

What you will need:
πŸͺ 1 - 2 Kiddie Bites plates. You can find these plates on Amazon and use code KIDDIE10 for 10% off your plate set.
πŸͺ 2 - 4 small snacks. For this, I used Kashi wheat squares, popcorn, chocolate chips, cheerios

There are 3 ways I found to set up the snacks to help your LO sort them. The first way was to place a few pieces of each snack in the smaller sections of your Kiddie Bites plates. Then in the larger section mix the 4 snacks together. Then explain to your little one what to do. Demonstrating how to sort is also a great way to explain. If you are demonstrating what to do say hooray and clap when you place the snack in the correct section. This way your LO knows they did it correctly. This can also be a fun game. Especially when your LO sneaks a few or all the snacks. 

The second way you can set this activity up is by placing all the snacks in the large container and let your LO decide where they go. This will also help to develop their independence.

The last way worked best for Sephira because she was way more interested in eating her snacks. So I took the mini wheat which was her least favorite and I buried her favorite snacks underneath. This is a similar concept to hiding toys under a blanket.

Hope you enjoyed this edition of Sensory Sunday!

Don't forget to follow my blog by clicking the Follow button at the bottom. Also, you can follow me on Facebook @Veggiemomster and on Instagram @SepiraLee_BrandRep.


Sunday, July 15, 2018

Sensory Sunday - Slime DIY


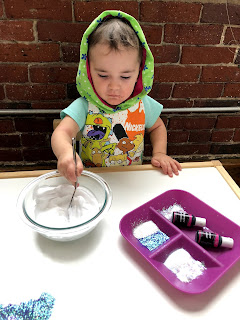
It’s been a long time since doing a Sensory Sunday. But we’re back and we are going to make some slime? I really like this sensory project because it’s super easy and fun for all ages. I'm going toshow you two fun ways to make your slime.


Here is what you are going to need for your Galaxy Slime;
πŸ’š4oz or 1/2 cup of white glue
πŸ’š1/2 cup of shaving cream
πŸ’š Fine holoraphic glitter
πŸ’šChunky holographic glitter
πŸ’šBlack and teal food coloring
πŸ’š1 tsp of borax
πŸ’š1 cup of water
πŸ’šSmall Jar to store your slime

First, in a small bowl combine the water and borax, then set aside. You can microwave for 30 second to help combine the borax/water mixture faster. Then, in a medium size bowl add your glue. Try and get all the glue out into the bowl by squeezing and flentening the bottle. You can now add your shaving creame, and glitter, then stir until all combined.  At this point you can add whatever fun items to make your slime unique (combuches, different size beads, buttons, charms, etc.). Now you’re ready to add your water borax mixture. This mixture is what turns your glue into slime. Start with 1 tbsp at a time and you can continue to add while you nead your slime. Once your slime is no longer sticky separate it into 3 piles. Add a few drops of your black foodcoloring to one pile and a few trops of your teal to the other. nead the slime until the coloring has been combined. This can get messy so you can use gloves to keep your hands clean. Now that everything is colored it's read to play with. **Remenber never leave your little one alone with the slime or the ingrediants.**


Here is what you are going to need for your green Nickelodeon Slime;
πŸ’š4oz or 1/2 cup of clear glue
πŸ’š Neon Green Glitter
πŸ’šRainbow Beads
πŸ’š1 tsp of borax
πŸ’š1 cup of water
πŸ’šSmall Jar to store your slime

First, in a small bowl combine the water and borax, then set aside. You can microwave for 30 second to help combine the borax/water mixture faster. Then, in a medium size bowl add your glue. Try and get all the glue out into the bowl by squeezing and flentening the bottle. You can now add your glitter and beads, then stir until all combined.  At this point you can add whatever fun items to make your slime unique (combuches, different size beads, buttons, charms, etc.). Now you’re ready to add your water borax mixture. This mixture is what turns your glue into slime. Start with 1 tbsp at a time and you can continue to add while you nead your slime. Once your slime is no longer sticky it's read to play with. **Remenber never leave your little one alone with the slime or the ingrediants.**


Hope you enjoyed this edition of Sensory Sunday!

Don't forget to follow my blog by clicking the Follow button at the bottom. Also, you can follow me on Facebook @Veggiemomster and on Instagram @Theveggiemomster.

Friday, November 3, 2017

Fall Activities

 
Being a new mom who is also working full time you end up getting stuck in the routine. Also, weekends end up getting filled with stress, errands, and cleaning. So I wanted to make a post of how instead of cleaning and errands during the days I have with her to spread it out strategically during the week between my husband and I. Then not to get too worked up if the house gets messy. This is always a sore spot for me since I like a clean house. But I think more quality time with my baby girl is worth the house getting a little messy. Here are some of the things we've been doing to get out of the house and out of the routine.

Apple picking. I mean this is a no-brainer during this time of year. There are so many farms around and it's so beautiful out while the leaves a changing. I was planning on going to get some groceries anyway. Why not have some fun outside while supporting local farms? Two birds one stone, am I right? To just go to these places it is usually free unless you plan on purchasing produce. Most will have farm animals you can pet. They usually have little goat feeding machines that you pay a quarter to get a hand full. But if you pick some apples they love these as well! There are also farms that will have hayrides and corn mazes for the kids.

Once you get all your fresh produce from the farm you can then cook something delicious. There are a bunch of sellers that make safety stool for kids. Then they can watch while you make all the pie fillings and put it together. If you're short on time and not crazy about baking try this recipe for Apple turnovers using crescent rolls.
Peel and cut up 3 apples into little cubes
In a large bowl add your apples, 1/2 cup of brown sugar, 1/4 cup of melted vegan butter, 1/2 tbs of cinnamon, a sprinkle of ground cloves and fresh ground nutmeg. Mix all the ingredients for about 2 minutes with a large spoon until the apples are completely covered.
Then lay out the crescent rolls.
Add a spoonful of the apple filling and roll them up.
Then bake according to the directions on the crescent rolls.
I also use the same filling recipe for my apple pies but I cut the apples in slices.

Taking a trip to Salem Massachusetts. There are so many places to just walk around here. Most are historical buildings. Then there are free haunted houses during Halloween. This would mostly be for older kids but during the day would be great for younger ones who are too young for the haunted houses.

Hiking is the next one that is always a good idea. Its free and a great activity to get you out of the house and away from the TV. There usually is a trail not too far from even a city. This is also great for introducing your kids to the forest. You can always read up on the area before you go so you can look like a great expert when your kids ask what type of trees or plants they see are called.

Explore new parks close or far from you. Playgrounds are so much more than they were even when I was a kid. Most have rubber grounds so it's much safer. Also, there will most likely be other kids there. For my little girl Sephira, this is important since she is not in daycare. So interactions with other children are even more important for her. Also if it's raining or too hot/cold out for a park some malls will also have a small area for kids to play in. For us, it's the Mall of NH. This indoor playground always has other kids. During the week is even better since it's mostly babies and toddlers.

Now that it is getting a bit colder out. Look into indoor playgrounds. We tried one of these in Woburn, MA called Vinkari Safari that was nice. For Sephira, it was a little overwhelming since she had never been there and there is no real separation from older kids. But I know if we go a few more time she will get used to it. Also if you have a friend/ family member that has a kid around there age bring them.

I hope this post gave you some good ideas on getting out of the house. If you have any requests for posts please email me at veggiemomster@gmail.com or visit me on Instagram or Facebook.

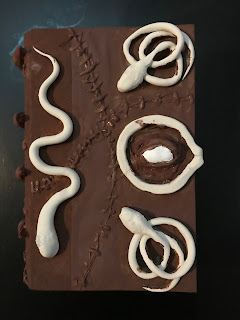
Hocus Pocus Spell Book DIY


For an awesome fall crafting DIY, I made a replica of the spell book from the beloved movie Hocus Pocus. There are a few things I would have done different so I'll let you know what they are.The pictures are from the way I had done this project so rather than follow the pictures ready what I wrote. Obviously, I was still successful with they why I had made it but I could have been easier.

The first thing is to ensure you have all your supplies. I was winging this project so I did not get all my supplies until a day after I started.

What you will need
-A hardcover think book. I used a copy of Harry Potter and the Deathly Hallows
-modeling clay
-brown, black, white, green, and silver paint
-fake fingers
-skeleton hand
-black tea
-bin for soaking the book in
-yellow gem
-glue gun
-hair dryer

The first you'll want to make about 5 cups of tea and add it to the bin. Soak your book for 5-10 mins. After it is done soaking squeeze out as much excess water as you can. Then using the blow dryer get it as dry as you can. I would dry for about 2 minutes then let it still for about 5-10 minutes and repeat. Let your book dry overnight before moving on to the next steps.

While your book it drying you can start on your clay pieces. I made 4 pretzel snakes by rolling out a piece of clay about the size of my fist. I made one end a little large for the snake’s head. I then wrapped it in a pretzel to match the original book.  I then make 2 more snakes that were in a wavy pattern. Then the lock and eye. I baked these in the oven according to the directions.

When the pieces are all baked and cooled down you can start painting them. When I did this I painted the pieces after I glued them on the book and this made it very difficult.

The next day when you book is almost dried you can start painting. First, start by painting the entire book brown. You will need to take breaks in between while you wait for things to dry. When everything is dry and you have painted the entire book you can start gluing on the clay pieces. Start with the front. I used a glue gun to accomplish this. Once all the clay pieces are glued on you can move on to gluing to the fingers. Take 4 fingers and glue the opening where you would put your finger together. I used a glue gun to accomplish this. Then paint the fingers brown. While you let them dry you can work on the skeleton hand. I had no luck finding a skeleton hand that had joints so I had to make due. I was able to find skeleton serving tongs that I was able to break then glue together at an angle. I found these things at dollar tree so it was worth the extra work. Then you will want to paint the hand silver. Once the fingers are dry you can glue them along the binding of the book. Then glue the hand on the back.

Once all the pieces are glued in you can start working on the details. On the real book, it looked as though sink was sewn together to make the cover. So I took my glue gun and made wonky lines on the front back and binding. I then make smaller crosses to mimic the thread that stitched the cover together. I painted them all brown at first. Again once the paint was dry I took a dry brush and a little bit of black paint and start to dry brush the black paint on the “thread” to make it look more realistic.
Now for the eye, using the glue gun start adding glue to the clay eye piece to make it look like it has eyelids. Then make sure to add glue around the eye to make it look like puffy loose skin. You can now paint the eye. I mixed a tiny bit of brown with the white to make the eye look older. The. Using a light green and brown I gave the eye a hazel color. Then using black I created the pupil. Make sure you let them paint dry after each step so the colors won't mix. After the eye is dry you can paint the eyelid and extras skin brown.

I added more black detailing to the book to make it also look old. Make sure you let the paint dry completely before moving on to another color like gold or metallic silver.

Once you are done adding the detail paint to get the book an old and worn look just let it dry. Now you can create a spooky table with your book in the center. Using a picture stand will give it a great look. Tune back into my blog we're we are going to create a spooky witches bottle out of a growler.


Don't forget to follow me on Instagram @theveggiemomster and Facebook veggiemomster.

Wednesday, June 21, 2017

Taking Photo's of you Little One - Flag Day Contest


Flag Day Photo Contest

So this week Sephira is in a photo contest. So I figured I would do a blog post on how to get an adorable photo of your LO. There are a few things you should always have handy for taking cute photos. Number one is a backdrop. For this, I usually use 1-2 yards faux fur fabric. This is great for laying your little one on. Don't worry about getting outside objects or backgrounds in the photo since they can always be cropped out. For the colors of the fur make sure you have black, white and cream always on had. These colors go with everything and you won't feel like you have to purchase a different color for each shoot. Another item that helps make positioning your little one easier especially for ones who can set up yet is a basket of some kind.  Again have a neutral color and/or print like chevron is great for most of your photo. With the fur, you can just lay it on a couch, bed, pillows, co-sleeper, or floor. You can also place it in the basket with the fur sticking out. Again this helps prop up little ones that can't quite sit up on their own. If you just want to use the basket and no fur you can try a towel, face cloths or cloth diapers to help prop your baby up. 
Use a Chevron basket to prop up your little one.
Something that also makes picture taking fun is props. These could be anything from holiday decorations to baby toys/stuffed animals. One thing to keep in mind with props is if you're not using these props outside of your pictures they can pile up. So using fresh flowers can cut down on the hoarding of props.


Now to my favorite part, dressing your baby. For newborn pictures having some cute bows is always a must. Again always have bows or bow ties in neutral colors black, white and cream. If you know that you are going to be taking lots of pictures red, orange, yellow, green, blue and purple are great to have in hand. When purchasing bows I always try to get head wraps. They can be a bit more pricey but they will grow with your baby. This way you are getting good quality and more pictures out of them. I purchase my head wraps from HelloMissGorgeous on Esty. They are great quality and they ship fast. 
Black Headwrap from HelloMissGorgous
If you're like me and love cute outfits then here are some of my favorite sellers on Esty that sell the sweetest outfits and accessories for photo shoots BBOWSBOUTIQUE, HelloMissGorgous, SofiaandBelle, NordeensBabyCouture, BabySquishyCheeks, BowtifulSoul, CandyFacesShop, and Katescouturedesign. If you are looking for cheaper more generic options then Amazon Prime always has options for not just clothes and accessories, but also baby photo props like faux fur, wrap blankets and cute accessories. Though I get my fur from Distinctivefabric.com. 
Onesie From BabySquishyCheeks and Shorts from CandyFacesShop

Headwrap from HelloMissGorgous

Headwrap from HelloMissGorgous and Fur from Distinctivefabric.com

For editing photo's there are 3 apps that I like to use. PS Express (free), FotoRus (Free with in app purchases) and Union ($1.99). Union has to be my favorite because you can have a photo of your LO and completely remove the background and replace it with whatever you want. PS Express is good for erasing minor blemishes. FotoRus is also good for blemishes and has some other crazy options to add makeup to your face. This is one of those in app purchases though.

If you like this post and I gave you a few ideas for photographing your LO then please share this with other moms. Also Please go to the link and like my Little Girl's photo on the Brady Sullivan Facebook Page so we can win! Thanks so much for reading!

Link to photo: Flag Day Contest

Monday, June 5, 2017

Matching Outfits Monday - Unicorns


Welcome back to Matching Outfits Monday, It's been a few weeks since I've been able to post one of these since my LO has been sick. But she is feeling much better now and we are getting back on track with our posts. So about a week ago we went to a circus camp and I needed some adorable outfits for the weekend. Also side note sometime in the next few weeks, I will post what we packed and how we survived the weekend with a teething 8-month-old with eczema.

So, back on track, of course, our outfits had to match in some way shape or form so I picked some easy categories and when from there. Our First day we when with Unicorns. You just can't go wrong with unicorns at a circus camp.

For my outfit, I wore a purple unicorn print t-shirt that I modified. I followed this tutorial to cut a v-neck with a collar into the shirt. I then paired it with some simple gray shorts and my platform jellies from UNIF. When it got a bit chilly I wore UNIF's pastel Forst Sweater. For accessories, I got a unicorn horn from Amazon. The headband was very tight so I cut it off and hot glued a hair clip. So nothing was wasted I took the elastic headband I cut off and make a hair elastic. To carry my LO around in I had a Unicorn Toki Doki printed LILLE carrier.


Links to my outfits hear
Shirt - XL
Sweater - XL
Jellies - 9
Carrier
Unicorn Horn - Color violet felt. I got the size medium but you can get it in an adjustable size if you don't want to use a clip.

More Importantly, my LO wore a  ruffle leotard from Baby Squishy Cheeks on Etsy. I was really excited to finds this seller because every time I found this style of leotard they didn't come with snaps for easy diaper changes. But these ones do and they come in 4 colors light pink, light purple, black and white. For this outfit, I purchased the light pink. Do be careful when washing, make sure they are will like colors and wash in a lingerie bag if you have one. 

I paired her leotard with the most perfect high waisted unicorn shorts from Candy Faces Shop on Esty. I loved the high waist on these shorts they just made the outfit. The high waist gives a cute ruffle top. They fit perfectly, I gave the owner Covantry my LO's measurements and asked her to make them a little larger. They fit perfect with room to grow without looking too big. My LO will be able to wear them for the rest of the summer. The shorts were pink with a unicorn and rainbow print. These shorts also come in the same print in blue. The quality is fantastic from this shop, the owner is passionate about what she does and its worth it to go and take a look at what she has to offer. This shop also has tons of other magical unicorn items to select from as well.

For Sephira'a accessories I found an adorable unicorn headband Bowtiful Soul on Esty. The headband was super sparkly and the unicorn figure was adorable. For shoes, Teeny Toes had the most perfect sparkle jellies to match mine. Also, in case if got cold I found a rainbow unicorn horn sweatshirt from Amazon that was a perfect fit. 

Because we had to drive 2 hours to the camp I was worried about having a diaper blowout in the car. so on our way, I dressed Sephira in some cute unicorn pajamas.

Leotard - 18 months
Shorts - Custom
Headband
Jellies - 3
Sweatshirt - 12 months
Pajamas - 12-18 months

Friday, June 2, 2017

Fast Fun Friday - Milksicles

This week on Fast Fun Friday we are going to make an easy snack, that will keep your LO entertained for a few minutes. As parents about 90 percent of the time you have other obligations like cleaning, cooking, personal hygiene or just need a few minutes not holding your LO. If your baby is anything like mine they like to be held 100% of the time so any amount of entertainment is helpful.

I call this snack a milksicle. What you will need to make these is a mini ice cube tray. I got mine from Amazon. Then about 2 ozs of either Breast milk, formula or milk. A fruit of your choice, here I am using frozen strawberries. A blender or food processor to blend everything together. Lastly, a mesh or silicone food feeder.  I use the mesh ones by Munchkin or silicone ones by Boon.

First, add 2 ounces of milk and 2 frozen or fresh strawberries to the blender. You want to completely liquefy the strawberries and milk. Once you do that you are going to add your strawberry mixture to the ice cube tray. You want to make sure the ice cubes will fit into the feeder once they are frozen. If they do not you will have you use a knife to chop it into smaller pieces so they fit.  The ones in the photo will fit in either of the food feeders that I have previously mentioned.  After you have your tray filled, pop it into the freezer. Because they are small they should only take a few hours to freeze. Once they are frozen you can pop them out of the tray and place them in a milk saver bag or a freezer bag. I will keep them for about a month if they even make it that long.