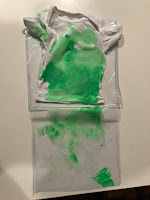
On Pinterest I have seen a bunch of sensory paint projects, that I have done with my little one. They are all very fun and they give you a nice keepsake. I will definitely be posting directions on how to put these together in the future. This post will be taking sensory painting to the next level with fabric paint. I came up with the idea since this would give you a keepsake your little one could use after the project.
You can make this as simple or as complicated as you want. I did mine in a few steps, but feel free to stop after the first.
Things you will need
An article of clothing that has been washed (I picked a white Gerber tee shirt)
Fabric paint you can pick up from most craft stores (I'm using neon sparkle green, glow in the dark green, sparkle pink and purple)
Puff fabric paint (I'm using green and purple)
3 Ziploc freezer bags (you will only need 2 if you are just doing the first step)
Duck tape
Scissors
Bolster or yoga mat
The first thing you will want to do is get your Ziploc bag ready. Because we are using clothing, you will need to add something in between the fabric. This way, the fabric won't stick together when the paint dries. I ended up using a cut up Ziploc bag for this, inside the shirt. My dimensions were 9x6 inches.
After cutting your bag, you will get 2 pieces. Insert one into the shirt (see image 1). Then place the shirt into your Ziploc bag. Go to the area you plan on setting up the project and bring all your supplies including your baby.
 |
| Image 1 |
I first taped down one side of the shirt (not the part with the opening because that's where we are going to add the paint.) make sure your article of clothing is flat, then add the paint carefully. I started with the neon green and glow in the dark green. Carefully push as much air out without smudging the paint too much. Close the bag up and tape it down to their playing surface.
My little one can't sit up yet, so I use a rolled up yoga mat to prop her up. You can also use a bolster, or tape it to their chair's tray. They watch them play. Don't leave the baby alone to play in case the bag gets punctured.
When they are done having fun, move your baby to a safe place like their crib or chair. Then take the bag to a safe place to dry. You first want to cut the bag off and slowly peel off the flap so you don't ruin their masterpiece. At this point, you can let it dry overnight and you're done. I did want to take it a few steps further with adding more color during another play session. This way I get more play out of one project.
Once the shirt was dry from the first session. I took the shirt and put it in a new plastic Ziploc bag. I repeated the process with pink and purple fabric paint. After she was done playing I cut open the bag and let the paint dry.
Again you could stop at this point you can stop and enjoy your baby's masterpiece. But I wanted to take it one step further. This part is more for the parents to enjoy doing. The paint said to let it dry for 72 hours before washing. So, I let the paint dry for 3 days the washed it. I then let it air dry. Using the puff paint I added some characters from my favorite 90s cartoons. This added some super cute detail to the shirt. Also, make sure you keep the plastic from the beginning of the project so you can slip it in between the shirt.
The puff paint that I used also takes 72 hours to dry before washing. But once you're done you have a super cute shirt that you and your baby made together.
Hope you enjoyed this edition of Sensory Sunday. Make sure you come back on Monday to see what our watch our outfit is for Matching Outfits Monday!
Don't forget to follow my blog by clicking the Follow button at the bottom. Also, you can follow me on Facebook @Veggiemomster and on Instagram @Theveggiemomster.


No comments:
Post a Comment