Friday, March 31, 2017

Fast Fun Friday - Ribbons


A great sensory play time is using different types of ribbon. There are so many types of colors, texture, and sizes. Because the ribbon is thin they will be great for baby's fine motor skills. I came up with this idea after my LO's 6-month photo. She was so interested in playing with the ribbon I used for the rainbow.  I alway try to have something that is a part of my LO's photos that will keep her attention and keep her happy. I also like this project because you can keep the ribbon in a plastic bag and use it again. Also, you can add more ribbon as time goes on. This will keep it interesting for your LO. You can add scraps of ribbon you may have from different projects, so they do not go to waste.

What you will need;
πŸ’œ Different color, texture and size ribbon
I'm using some thin red, orange, yellow, green, blue and purple ribbon. Then some thinker black and white ribbon.


For this project, I just propped my LO with a rolled up yoga mat and DockATot and placed the entangled ribbon.

Do not leave your LO alone with the ribbon because this could be extremely dangerous if they get too tangled.

Don't forget to follow my blog by clicking the Follow button at the bottom. Also, you can follow me on Facebook @Veggiemomster and on Instagram @Theveggiemomster.

Monday, March 27, 2017

MOM - Blue and Grey Skies

This week on MOM I'm doing a more simple look. Matching outfits don't have to be identical to match. This is one of my more casual, comfy but, still awesome looks. I ordered a custom size 2 piece jumpsuit from one of my favorite sellers on Etsy ElvenForest. I love this jumpsuit because you get the best of both worlds. First, this is a jumpsuit that you don't have to get naked to go the bathroom. Also, this jumpsuit is good for breastfeeding mommy. It gives you plenty of access and privacy with its cowl neck. They sell the pants in a flared style as well. I picked the gypsy style because I wanted the gray color. But, I'm glad I did because they are spectacular. A reason I like ordering from here is your ability to give your exact measurements. This way you don't have to worry about if it will fit. You will definitely be seeing this jumpsuit again in another edition of MOM in a different color or one of their other awesome pieces. Please note that these are custom and handmade items, so be kind to your Esty seller and give them the time it takes to create their masterpieces.


For my Little One, I found a sweet jumpsuit with snaps at the bottom for easy diaper changes. Then I made another pair of baby sandals with some elastic and ribbon from Joann's Fabrics. Click HERE for the tutorial.

This look is great for a day at the park, festival or concert. You can also, dress it up with some heels and dramatic makeup for a more night on the town look.

Mommy
πŸ’™ Grey Gypsy Pants
πŸ’™ Blue Cowl Neck Crop Top
πŸ’™ Grey Jacket
πŸ’™ Blue Baby Carrier
πŸ’™ White Faux Leather Necklace

Baby
πŸ’™ Heather Blue Jumpsuit
πŸ’™ Grey Rose Bow
πŸ’™ DIY Baby Sandals
πŸ’™ Grey Long Sleeve Onesie
πŸ’™ Still on the hunt for a Faux Suede Jacket for Baby. I'll update if I ever do. Here is one for an older child. You could also pair with a gray baby sweater.

I hope you enjoyed this week's Matching Outfits Monday as much as my LO and I do. See you later this week for a baby picture's tutorial.

Don't forget to follow my blog by clicking the Follow button at the bottom. Also, you can follow me on Facebook @Veggiemomster and on Instagram @Theveggiemomster.

Sunday, March 26, 2017

Baby Shirt Tutorial


Today we are going to make a cute Easter shirt. This is a great project for when you are strapped for cash bust still want a super adorable outfit for a party, photo shoot, or just for every day.  I used a sewing machine to make the process go a bit faster, but if you have the time and patience then you can use a hand needle and thread.

What you will need for this project;
πŸ’› Fabric, of your choice (I choose broadcloth with an Easter print that I got from Hobby Lobby
. Broadcloth is extremely easy to work with especially if this is your first time sewing.
πŸ’› Thread
πŸ’› Sewing machine or hand needle
πŸ’› Scissors
πŸ’› Tape Measure
πŸ’› Iron
πŸ’› Pins
πŸ’› Snap Closure or Elastic
πŸ’› Any extra embellishments (optional)
πŸ’› Double Folded BiasTape (optional)

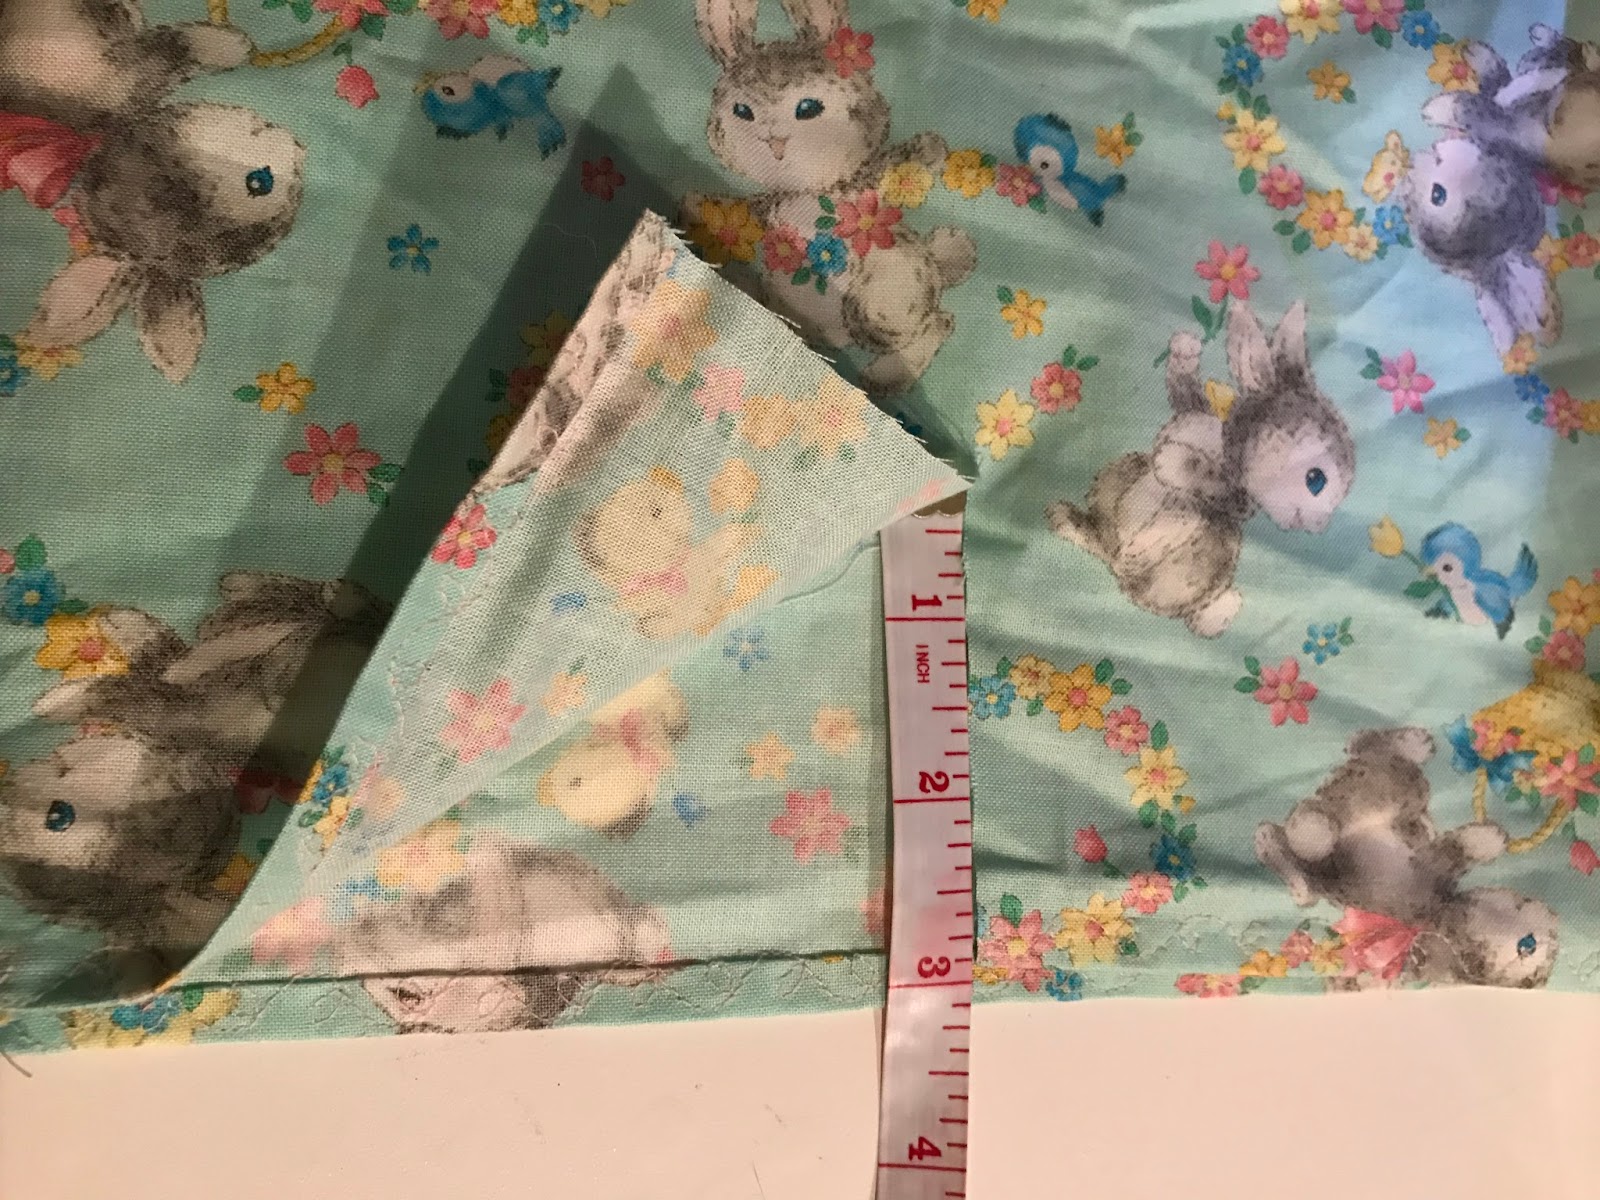
First, you want to measure your baby's chest, you will need a tape measure to do this. With you baby lying down wrap the tape measure around their chest. For my LO I got 19inches. I added an extra inch for seam allowance. I then with my fabric I cut 2 identical pieces. This will be the front and back of your shirt. For mine, the top measurement of the pieces is 10, the bottom is 18 and each side is 9. The 10 comes from half of my LO's chest measurement. The bottom was 4 inches longer on each side than the top (10+4+4=18). The sides came from how long I wanted the shirt to come down plus an inch for seam allowance.  After measuring out your fabric you should come out with a trapezoid. Cut 2 trapezoids with the same dimensions.

Now we are going to finish our edges. You can use double folded bias tape or you can double fold the fabric like I did and use an iron to make your creases before sewing. If you are using an iron make sure your fabric can withstand the heat and won't melt. First, you want to fold over your bottom edge of your first trapezoid and iron that down. Then fold it over again so you can longer see the rough edge and iron that down. Repeat this for just the top and bottom edges of both of your trapezoids (NOT the sides).
One Fold
2nd Fold


Now to sew those sides down. I have a Singer Patchwork machine so I chose a cute leaf stitch but any stitch will work for this. Taking your machine or needle and thread tack down the sides you just ironed.

Once that is complete you can sew your 2 pieces together. Make sure you place your fabric with the print side facing each other before sewing. This is so when you sew your pieces, the seams are on the inside of the shirt. Pin them together, then using your machine or needle and thread sew the 2 raw edges together.


Once the 2 pieces are sewn together you can take the pins out and turn it right side out. now its time to add your closure. I'm suing some sew on snaps. The fist thing you want to do is decide what side you want to be the front. Then at the top of the back piece right in the middle cut it down 3 inches.

The like we did in the beginning, fold the raw edges down twice, iron, then sew to finish your seam.

This is a good time to try it on your little once to see where you need to add your closure. Once you add your closure you are done. If you want you can also add some embellishments to finish it off. I have this crystal button that I added to hide the stitching from the closure.


For bottoms, I took bloomers from another outfit or you can purchase some really nice cheap ones from NordeensBabyCouture. They have them in every color and they are really soft.

I hope this was a fun and easy project that gave you an opportunity to get creative and save some money.

Don't forget to follow my blog by clicking the Follow button at the bottom. Also, you can follow me on Facebook @Veggiemomster and on Instagram @Theveggiemomster.


Friday, March 24, 2017

Fast Fun Friday - Rice Play


This week for Fast Fun Friday, we are going to be playing with rice. I like using uncooked rice for playing because your baby will be able to manipulate it easier. You can write numbers and letters using your babies fingers or your own. Also, rice is one of the best things for fine motor skills.

Thing you will need;
πŸ’™ Rice
πŸ’™ Pan or Tupperware
πŸ’™ Food Coloring (Optional)
πŸ’™ Small Baby Toys (Optional)

If you have food coloring you can also add color to your rice. If you decide to do this I would suggest making 2 to 4 separate bowls of rice and coloring them each a different color. Then on your pan, you can add each color of rice to the separate corners. Your little one will have fun as they mix the colors together. If you don't have any food coloring you can use different types of rice for you LO to mix together. Some good options to mix would be White, Brown, Chinese Black Rice, Wild Rice, etc.
Also, like more of my Fast Fun Friday project you can add small toys to the rice. Feel free to add more rice to hide your LO's toys so they can use their hands to dig for them. Rice will get everywhere so make sure your playing surface is easy to clean.


*Never leave your baby alone unsupervised while playing with the rice. 

Hope you had fun with this quick and easy sensory play. Tomorrow we will be doing an Easter outfit sewing project, so stay tuned.

Don't forget to follow my blog by clicking the Follow button at the bottom. Also, you can follow me on Facebook @Veggiemomster and on Instagram @Theveggiemomster.

Saturday, March 18, 2017

DIY Baby Sandals


In a lot of my looks for MOM, I make Baby Sandals. These give me more control over the outfit and also adds a super cute detail. These are extremely easy to make and can be done with just a thread and needle.

What you will need for this DIY
πŸ’™ Printed or colored elastic (you can find this at most craft stores but, this one is from Joann's Fabrics)
πŸ’™ Embellishment for the top. This is optional but I highly recommend it
πŸ’™ Tape Measure
πŸ’™ Scissors
πŸ’™ Needle
πŸ’™ Thread

First measure your baby's foot loosely. Place the top of the tape measure on the top of your baby's foot. Then, wrap it around their heel back to the front. Then cross over the starting point and go around the bottom of the baby's foot.


Then cut your elastic a quarter inch larger.

With the elastic, wrap it around your baby's foot in the same manner that you measured it. Holding the two edges in place slip it off your baby's foot. Then, using your thread and needle sew the 2 edges together. If you are not adding any embellishments you can stop here and you have your baby sandal.

But I like to add something to hide the raw edges and stitching. I found some cute ribbon and created a bow. I then sewed the bow in place so it was more secure and baby couldn't undo the bow.  To finish it off I attached the bow to the sandal. Now just repeat the process for your second sandal and you're done.

Come back on Monday to see one of the outfits these sandals match.

Don't forget to follow my blog by clicking the Follow button at the bottom. Also, you can follow me on Facebook @Veggiemomster and on Instagram @Theveggiemomster.

Friday, March 17, 2017

St Patrick's Day Milk Bath

Happy Saint Patrick's day everyone! I love doing mini photo shoots with my little one for a holiday or milestone. I always find amazing baby pictures on Pinterest done by professional photographers. Though you are never going to get the same results that you would with a professional sometimes availability or money can be an issue. So this is an easy and affordable option.

Here is what you'll need;
πŸ€ 3 cans of coconut milk ( I'm using a Whole Food Brand Canned Coconut Milk)
πŸ€ A whisk
πŸ€ 2 different types of Shamrocks alive and plastic. I was lucky to find both, my Whole Foods always carries live flowers or plants for the current month/holiday. I also found plastic hydrangeas is 3 different shades of green at Hobby Lobby. So when I added the fake flowers they sank to the bottom pretty quickly so I would recommend you still get them and add a few before each picture you take. This way some will still get in the picture. Also, the shamrocks that worked the best we the small ones that were real. Make sure you cut the entire stem off of the real shamrocks so they do not show in the picture.
πŸ€ Green Baby Photo Prop Wrap
πŸ€ Chair for your baby
πŸ€ Your Baby (Sorry no link for this one)
πŸ€ Green or Gold Hair Bow or Bow Tie (I found one from one of my favorite Etsy sellers NordeensBabyCouture)


Start by Precutting all you real or plastic shamrocks and place them in individual bowls. I also took down my shower curtain and put one of my lamps in the bathroom for extra light.

I then filled the bathtub halfway with warm water around 97 degrees (I have a food thermometer I use to check the temp). Add your 3 cans of coconut milk 1 at a time. After adding each one, take your whisk and whisk the water and coconut milk until there are no chunks left. Then fill the rest of the tub while whisking the water. When you are done filling the tub there should be about 3 inches of water.

Place you baby in the tub with their bow on and draped in their prop wrap. I add the flowers after the baby is in the water so I know where I want them and where I need more or less. Then just click away.

I make funny faces and sounds to get her to laugh and smile for the pictures. Also, have a flower or shamrock for baby to keep them engaged. Don't worry about getting the tub sides in the shot we are just going to crop them out in the end. Throughout the shoot, I add more flowers or move them around to get different pictures.


Make sure you never walk away from your baby once they are in the bath. So make your you have everything you need in the bathroom before you start or you have an "assistant" to help you out if you have forgotten something.

I hope you get some fabulous pictures of your baby and remember you can do this for any holiday/milestone with all different kinds of props or flowers.

Don't forget to follow my blog by clicking the Follow button at the bottom. Also, you can follow me on Facebook @Veggiemomster and on Instagram @Theveggiemomster.


Fast Fun Friday - Water Play

This will be the easiest edition of Fast Fun Friday ever! All you need for this is you baby, water, and a pan. This is a similar concept as giving your baby food to play with. It does give the added splash of the water and sound it makes when they splash.

What you will need for this project
πŸ’§Water
πŸ’§Pan
πŸ’§Towel
πŸ’§Bolster or rolled up yoga mat
πŸ’§Toys (Optional)
πŸ’§Nontoxic Baby Soap (Optional)
πŸ’§ Food Color (Optional)

First lay a towel down on your baby's play surface. Put your pan on top of the towel. Then take your pitcher of water and fill the pan half way. You can start playing or add some soap or toys. If you add soap just swish the water around to make the bubbles.  If you are using food coloring you may want to use a clear Tupperware so you will be able to see the color. Once you get all set up, you can start to play with your little ones.


Hope you had fun with this quick and easy sensory play. Stay tuned tonight for a St Patrick's day πŸ€ milk bath tutorial.

Don't forget to follow my blog by clicking the Follow button at the bottom. Also, you can follow me on Facebook @Veggiemomster and on Instagram @Theveggiemomster.

Thursday, March 16, 2017

Mother's Room Upgrade!


I have been back to work for about 2 months now, and I pump 3 times a day for about 20 minutes. I am one of those lucky few that has a company that supports their breastfeeding journey. Recently I have found that not everyone is as lucky as me especially with the number of times I get to pump and the duration.

But I thought I might get a little bit more greedy with my Mother's Room situation. As I was pumping one day try out some of my suggestions I made on my 10 Things to do While Pumping blog entry, I noticed how bright the light was. I'm sure as most of you know the mother's room is usually a tiny room with a desk, chair, and fridge if that. But we also got an industrial sized fluorescent light. Oh yeah, that's relaxing. So I wanted to add a few things to our room to make the 3 times a day I visit it more pleasant, and not just for me for all the mothers. So here is a list of the things I think all mother's rooms should have. This way if something is forgotten or broken your day is not lost.

πŸ’œ Mood Light

πŸ’œ Breastpump Sanitize Wipes

πŸ’œ Breast Pads

πŸ’œ Snacks (Water, and Made Good Chocolate Chip Granola Bars)

πŸ’œ Nursing Tea

πŸ’œ Replacement Parts

πŸ’œ Milk Storage Bags (Lansinoh)

πŸ’œ Tissues (Puffs Plus Lotion)

πŸ’œ Notebook and Pen

πŸ’œ Baby Wipes (Whole Foods 365 Brand)

πŸ’œ Hand Sanitizer

πŸ’œ Paper Towels and All Purpose Cleaner or Disinfecting Wipes (Seventh Generation Brand)

πŸ’œ Steam Sanitize Bags

πŸ’œ Coloring Book and Crayons
Before  
After

After

I hope this inspires you all to upgrade your mother's room. Let me know what else you added to your mother's room.

Don't forget to follow my blog by clicking the Follow button at the bottom. Also, you can follow me on Facebook @Veggiemomster and on Instagram @Theveggiemomster.